Saturday, December 29, 2012
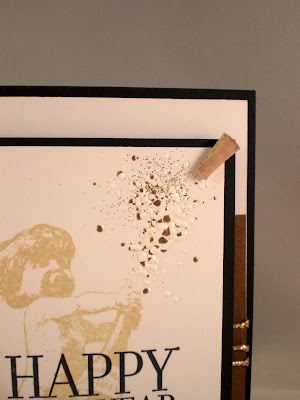
Happy New Year-pop that cork!
Happy New Year everyone! I love this little image and created some foamy champagne spray using the Fran•táge method with Stampendous Shabby White Embossing Enamel.
I added a piece of mini cork, shaved to lay flat. Unfortunately, the company I ordered the little image from, Scrolls Work Design, went out of business! I'm not sure if you could find the same image somewhere else...but I really like him so I decided to share...thanks for stopping by!
I'm entering this for Simon Says - Anything Goes Challenge
Thursday, December 27, 2012
Vintage Santa Baby
I know, I know...Christmas is over...but I thought I'd share this card anyhow since I'm considering using it for a scrapbook layout. I just love the sentiment stamp called Merriest Wish, it feels so 'retro'...not quite vintage, but from the Fifties. I say that because when I saw it, an old Christmas photo of me as a baby popped into my head. But when I hunted down the photo I was mistaken, the font is different...
...but hey, put a Santa hat on me and I could pass for jolly old Santa with those chubby cheeks! Thus, I may need to turn the card into a scrapbook page!
The Santa image is from a set called Jumbo Vintage Santa, sold out currently at Stampendous, but I found it at my local scrapbook store, Heartfelt Creations, and they also carry it online at 7 Kids College Fund.
Tuesday, December 18, 2012
Stampendous Cardinals Christmas
I finally got some crafty time this weekend and was able to play with this awesome set from Stampendous called Cling Jumbo Cardinals. The holly leaves and berries image, stamped lightly in the background, comes in the same set. The Merry Christmas sentiment is from the Christmas Background stamp. The Cardinals were stamped in Memento Black Tuxedo ink and colored with the few Copic markers I own...I really debated on coloring them both the bold red that is common for the male, but I remember hearing that Cardinals mate for life so I thought I'd give in and color the female with the more subtle colors...truly love that red cardinal though!
Did I say this set is awesome? Here's another card using the holly leaves and berries image:
The sentiment is from Merriest Wish which comes in either wood mounted or cling rubber.
And the last one used the holly and berries image but a Thank You sentiment from Thoughtful Wishes from the October Catalog.
I guess you can tell I kind of like this set...thanks, as always, for stopping by.
Saturday, December 15, 2012
Stampendous Silver and Black Christmas
Hi, Barb here, playing at being a BlogStar once again for Stampendous Impressions! Boy these three months are flying by! This week I've taken a little bit different spin on this great Christmas Background stamp. I realize black is a little out of the ordinary for a Christmas card, but I like the contrast, and black and silver just speaks 'elegant formal' to me. The Detail Silver Embossing Powder works great for the fine text on this card.
Saturday, December 8, 2012
Clean and Simple - Sparkly Winter Wishes
I made this quick card for a co-worker and his family who are struggling financially this season and several of us wanted to help him out...I thought this was the perfect sentiment from this Stampendous Clear Stamp set called Kiddo Snow Globe.
And speaking of Clean and Simple, you should play along with the December Challenge at Stampendous Impressions CAS Christmas Cards All Month!
Might give you some good ideas for some last minute Holiday fun!
Thursday, December 6, 2012
Blog Candy Winner-Stampendous Charm Collection
Thank you all for your sweet comments on the Seashell Wreath-Stampendous Indus Trading Company Blog Hop! ! Here's the prize:
Out of 22 comments, Random.org chose #12 -
mauiquilter said:
"My Christmas cards have shells on them! Love your wreath - the bird in the bottlecap is just plain sassy! For some reason, I am really drawn to the Eiffel Tower these days!"
Please contact me at b_turpin at comcast dot net with your mailing information.
Thanks for hopping!
Gold and Silver Stampendous
Gold and Silver...gotta love it! Reminds me of a record album by an old San Francisco band called Quicksilver Messenger Service...what memories!
Anyhow, I did a bit of a different take on this Gold and Silver Challenge over at DYSU Challenge Blog (Do You Stack Up). This can be used as a gift card holder or to hold yummy Christmas candies or whatever you can stuff into the size can you've chosen.
Start with a pop-top can, preferably one with fruit because it cleans up so easily...then, turn it upside down and use a smooth edge can opener to remove the bottom of the can...leaving the pop top in place.
Measure around the can as well as the height of the can and cut a piece of cardstock to fit. Find a fabulous stamp like this Christmas Background from Stampendous. I stamped with Versamark and sprinkled gold and silver alternately down the paper.
Then I attached the stamped cardstock to the can using Beacon Zip Dry adhesive - Love this stuff! -
After you stuff the can (with confetti, gift card, candy, socks, coal...) turn it upside down and glue the bottom, add some ribbon and a cute little tag (Get Socks)...then when the recipient opens the can they have a totally personalized gift...lots more fun than opening an envelope Christmas morning!
http://barbsboys123.blogspot.com/2012/12/gold-and-silver-stampendous.html
Saturday, December 1, 2012
Seashell Wreath-Stampendous-Indus Trading Co
This cute little bird in the bottle cap is from the Charm Collection
...and I just happen to have a set to give away to one lucky winner...just leave a comment on my blog telling me which little image you like the best and I'll draw a name and announce the winner on December 6th. Can you spot more little 'charms' on this next shot?
I also used the Carte Postale stamp and some great Stampendous Essentials Embossing Powder and Mica Fragments.
Well, there's a lot to see so have fun hopping! And MORE BLOG CANDY!
At each blog (or just the ones you want) leave an insightful comment that lets us know you actually looked at the project and we'll enter you once for each comment in a chance to win some DIY Bangles, beads, or circles plus some Stampendous goodies with which to embellish them.
Tip...I also covered the raw wood circle with Shabby White Embossing Enamel just in case the wood showed through the sea shells...
Monday, November 26, 2012
Stampendous-DIY Bangles
Hi there...welcome to the first day of the Stampendous Blog Hop Collaboration with Indus Trading Company-DIY Bangles
Here is my take on altering these fun wooden Bangle Bracelets:
It was really so simple to do, the most difficult part was deciding what design I wanted to use. I just rummaged through my really, really old craft stash and found some very, very inexpensive Acrylic Paint which surprisingly enough wasn't even dried out!
I decided to test my design on some inexpensive wooden craft sticks I had purchased for another project to see how the product would react. The acrylic paint dries very fast so there's not much down time. After painting the sticks I pulled out my Fran•táge Embossing Kit. I love the way the Copper showed up on the Black Plum paint, but you really had to see it in a certain light for the image to show up, so I decided on the Aged Silver. I may go back and create another Bangle with the Blue and Copper together.
I used the flourish from Stampendous Cling Jumbo Tulip and inked it up with some Versamark and then sprinkled the Aged Silver Embossing Powder and heated it up...reminded me of soldered silver.
Here's the final product, be sure to stay tuned to the Stampendous Impressions Blog all week, there are some awesome creations from the Design Team members. And on Saturday there will be a Blog Hop with all new submissions!
Labels:
DIY Bangles,
Essentials,
Jumbo Tulip,
Stampendous
Friday, November 23, 2012
Thinking of You...a Remembrance
I have a remembrance from when she passed away, a bronze rose, which was the inspiration for this card...
Since she's been in my thoughts so much this month, I chose to use this inspiration for the Stampendous November Challenge to use Stampendous Essentials.
I mixed up some of the Aged Gold and Aged Silver, threw in a little Copper Embossing Powder and used the combination to heat emboss the rose image and to change the color of the silver label. Then I used some Mica Fragments to sprinkle across the bottom of the card, I love the way the light shines on them in real life and they reminded me a little of fall leaves.
Hope everyone had a wonderful Thanksgiving, filled with good memories.
Sunday, November 18, 2012
Stampendous-Paris Home Decor
Hi, Barb here again, playing BlogStar for Stampendous Impressions.
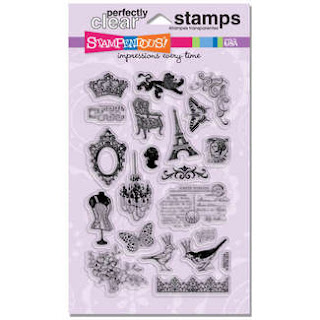
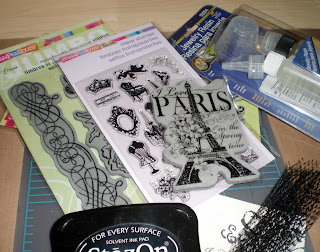
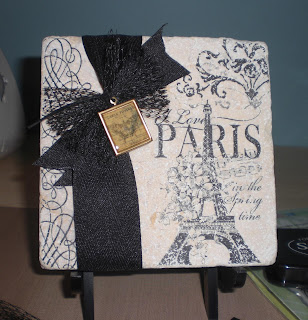
I love how simple it is to stamp on tile. Here are the step by step instructions, starting with the supplies I used:
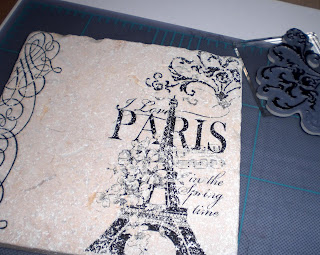
First I stamped a flourish edge on the tile using Stampendous Cling Jumbo Spring Bouquet.
Next, I used I Love Paris.
...and then a flourish in the upper right corner from the set called Cling Jumbo Tulip.
Add some gorgeous black ribbon from May Arts, and some 'found' netting:
But wait, it needed a little something else, so I used the Charm Collection with some Envirotex Jewelry Resin.
Add a simple black easel, and Voila!, a hand made gift...easy peasy!
Thanks for stopping by...always nice to hear from you!
Friday, November 2, 2012
Toes...Breathe in the freshness of the Sea
My toes, breathing in the freshness of the sea in Oregon...when I gave this to my daughter-in-law she thought the photo came with the frame...hubby said "wonder how it would have turned out if you'd painted your toenails"...me, "they are painted!"
I bought this very plain, slightly damaged photo frame for next to nothing and thought it would be perfect to alter. I am kicking myself for not taking a picture of the 'before'! I stamped the sentiment from Stampendous 'Breathe' rubber stamp using Versamark ink and Stampendous Clear Bark Embossing Powder. I love the way this embossing powder looks in real life...almost looks like fine vinyl.
Excuse the glare, I was having a heck of a time with anything technical this weekend, couldn't even remember how to turn off the flash in my little camera...and I know I've done it before...AAADD...Age Activated Attention Deficit Disorder.
Anyhow, then I used the Stampendous Shabby White Embossing Enamel in the upper corner...it reminds me of sea foam and golden specs of sand.
I found a bag of sea shells at Michael's and adhered a few to the frame using Beacon Zip Dry Paper Glue. I added a piece of lovely May Arts ribbon in navy.
Brings back memories of our recent trip to the Oregon coast...love the sunsets on the beach.
Thanks for taking the time to visit.
Monday, October 29, 2012
F. E. LINUS
My oldest son has a birthday coming up and he is a bit of a non-traditional, Steampunk kind of guy...and loves cats...so I thought of him when I saw this Stampendous Cling Felinus. "F.E. Linus, top-hatted kitty and Spectacle Maker is a skilled Lapidary on the side! That means he prepares raw stones for sale while grinding lenses for your vintage glasses. This astute fellow is the ninth in his line. Use him to create Fran•taáge greetings for your cat loving friends".
I started out sponging some distress ink on the edges of the buttery tan card stock. I then stamped F. E. Linus with distress ink, and stamped the flourish from the Cling Jumbo Tulip set. Then I played with the Fran•táge technique, using Aged Gold Embossing Enamel and Tarnished Mica Fragments. And don't forget the sentiment...this came from Vintage Typewriter. I stamped the paper image on a separate piece of light cream card stock and inked the edges, then stamped the 'happy birthday', slightly curving the clear stamps. I attached the 'notes' and the metal clock embellishment with Beacon Zip Dry Paper Glue and then attached to a black card base.
Thanks for stopping by, always love hearing from you!
Labels:
BlogStar,
Felinus,
Fran-tage,
Jumbo Tulip,
Masculine Birthday,
Ryan,
Stampendous,
Steampunk,
Vintage Typewriter
Saturday, October 27, 2012
Stampendous October Release Blog Hop
I love playing with this fun new set from Stampendous called Children Play. I've paired this sweet little image with another new set called Thoughtful Wishes ...lots of cute curvy sentiments. And speaking of fun, do you just love the Purple Color Fragments combined with the Aged Gold Embossing Enamel? Really reminded me of fall!
I stamped the image using Memento Black Tuxedo Ink, added a little color with a couple of Copics, used the Fran•táge Technique to add the Gold Embossing Enamel and Purple Color Fragments. Then I rounded the corners, added this awesome pleated ribbon from May Arts, punched a scallop edge and matted the purple card stock onto a mustard card base.
Check out some of the new images in the Stampendous October Catalog.
There's lots of inspiration to be had, and prizes too; so be sure to follow along on this great New Release Blog Hop! If you happen to get lost along the way, go back to the Stampendous Blog.
Annette Witherspoon
Asia King
Barb Turpin - yes, that's me!
Cyndi Bundy
Janelle Stollfus
Jennifer Ingle
Jennifer Dove
Kristine Reynolds
Lea Kimmel
Mary Dawn Quirindongo
Melinda Gleissner
Pam Hornschu
Rhea Weigard
Suzanne Czosek
Taylor Usry
Tenia Nelson
Tobi Crawford
Wenday Jordan
Wendy Price
Yana Smakula
Friday, October 26, 2012
Stampendous - October Release
I just love vintage children images like this one from the new Children Play. And even though the image doesn't start out as a silhouette, it is easily turned into a silhouette image with a Copic marker.
The sweet sentiment is from another new set called Thoughtful Wishes.
Add some Core'dinations embossed card stock and some pretty May Arts ribbon and you're all set!
Be sure to see all of the wonderful inspiration today over at the Stampendous Blog, browse through the catalog, and definitely come back tomorrow for the grand finale Blog Hop. Much fun to be had! Here's the Friday lineup...
Tuesday, October 23, 2012
Cherish - Fabulous Florals
This is the last day for this color combination at CR84FN, but be sure to play along for the rest of the month over at the Stampendous October Challenge - Fabulous Florals! And speaking of Stampendous, this brand new sentiment stamp (stamped with Clear Bark Embossing Powder) is from Rose Thoughts...check out the October catalog HERE!
There is some awesome inspiration from this new catalog over at the Stampendous Blog all week long.
Labels:
Clear Bark Embossing Powder,
CR84FN,
Jumbo Cling,
Rosehips,
Stampendous
Subscribe to:
Comments (Atom)

